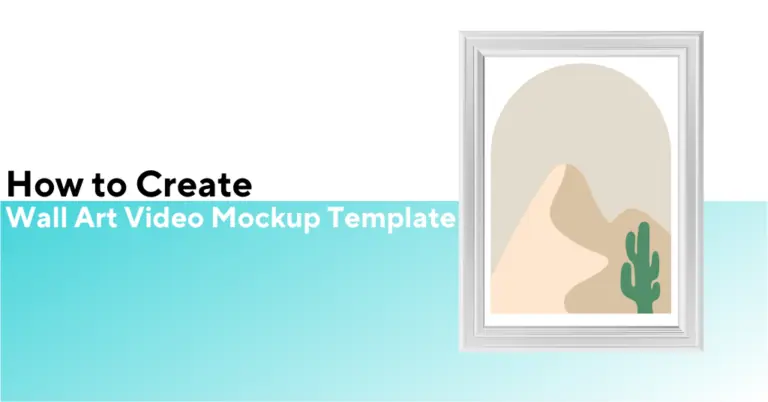
How To Create Wall Art Video Mockup Template For Etsy Sellers? [ 2025 Ultimate Guide ]
Creating Wall Art Video Mockups: A 2025 Guide. Learn to make dynamic templates that showcase your art with smooth zooms and pans. Join the trend that’s tr...
Have you seen the hot new trend in e-commerce this year? It’s all about video mockup templates! Surprisingly, many Etsy sellers haven’t caught on yet. One shop even made over $82,000 just from wall art video mockups!
Why Is The Demand For Video Mockup For Wall Art Exploding?
As photographs did for advertising, video mockups are changing how we present digital products. Rather than static images, these let potential buyers visualize how a piece of digital art will look in their home.
This shift is largely driven by consumer psychology. Art can be hard to visualize when shopping online. Static images just don’t cut it. With video mockups, buyers can see the art in action—smooth zooms and gentle pans. The immersive experience draws you in.
This trend is also fueled by social media and e-commerce. Instagram, TikTok, and Etsy algorithms reward video content more heavily.
Lastly, remote work is making home decor more popular. Buyers are increasingly drawn to engaging video demonstrations that show how art fits into their living environment. It’s all about giving them that visual boost to buy!
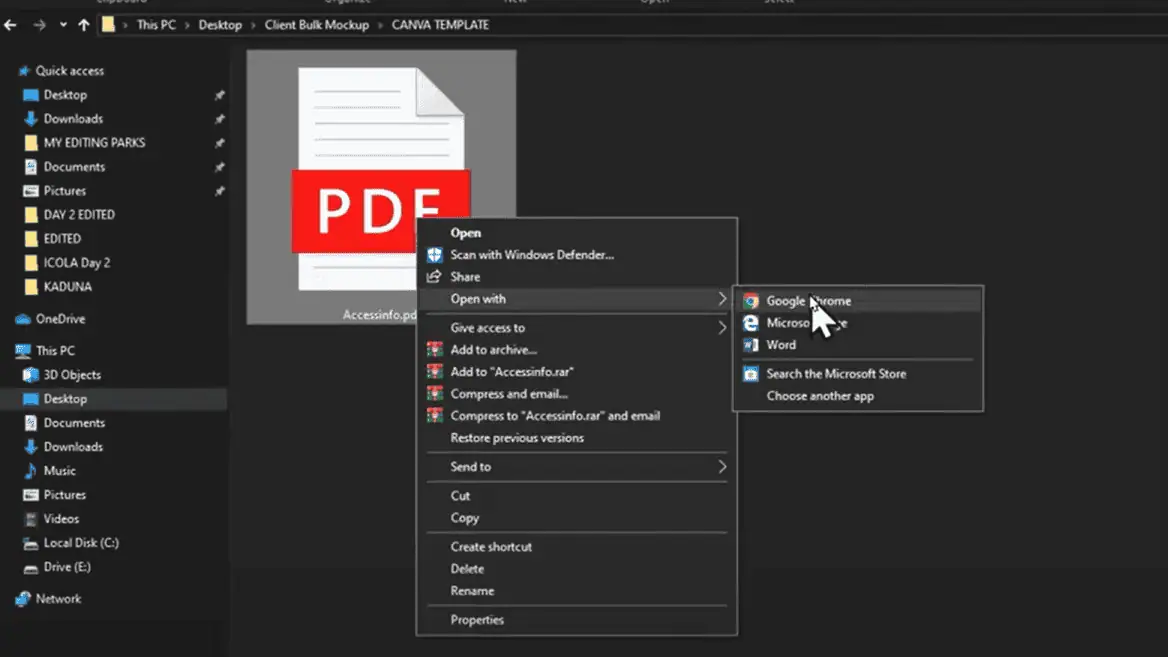
How Can You Create Polished Wall Art Video Mockup Templates on Adobe Photoshop?
Here’s the detailed setup process you need to create a wall art video mockup free on Photoshop.
Create Your Project File:
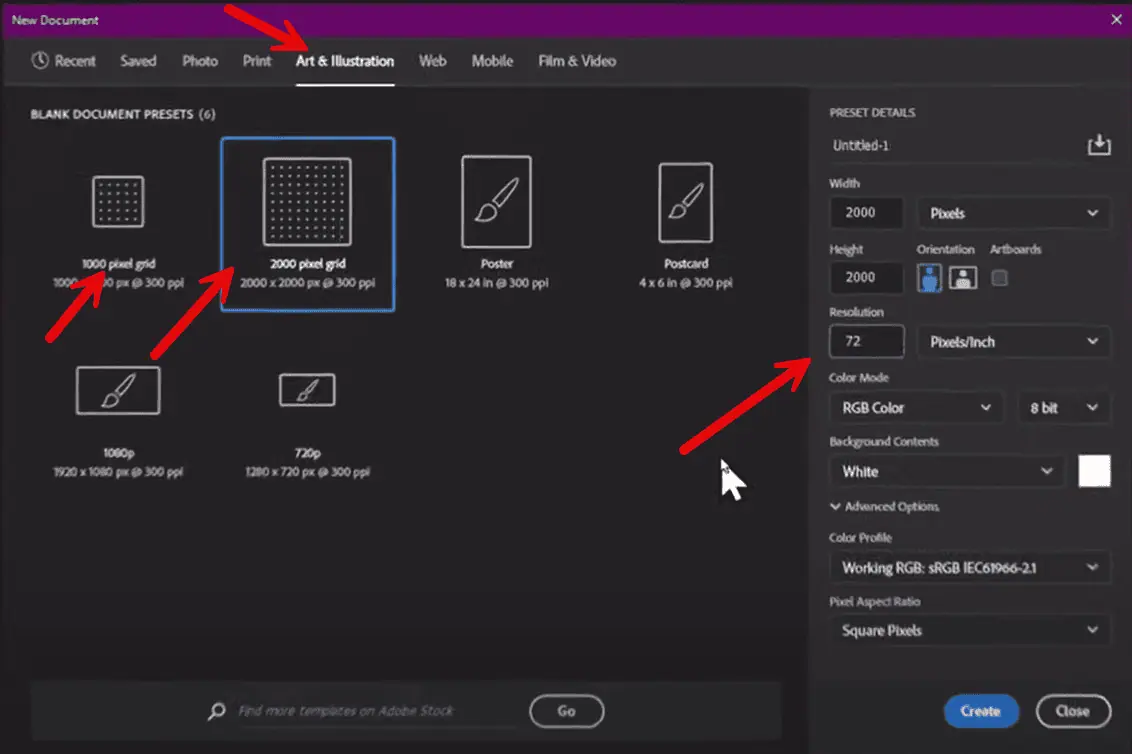
Open Photoshop and click on “New File”
Select “Art and Illustration” from the presets
Configure your dimensions:
The best aspect ratio for Etsy listings is 1:1 (square). You have two options:
1000-pixel grid
2000-pixel grid (recommended for better quality)
Important: Change the resolution to 72
Click “Create” to generate your canvas
Importing Your Assets
Import your rendered interior images
You can use three or more scenes depending on your desired variety
For this guide, we’ll work with three scenes
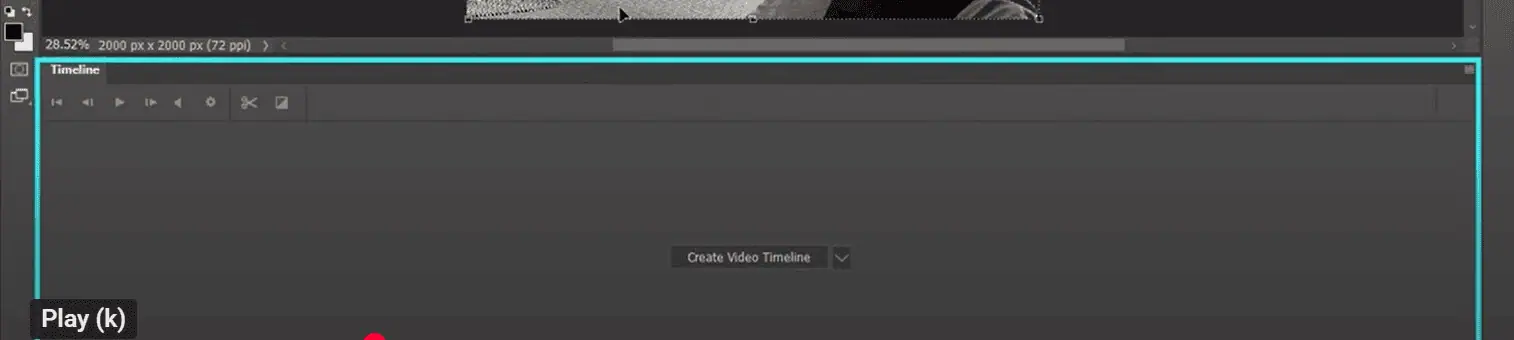
Access the Timeline interface:
Go to Window
Click on Timeline
This opens the interface for adding animations and keyframes
Initialize the video timeline:
Click on “Create Video Timeline”
Your imported images will automatically appear on the timeline
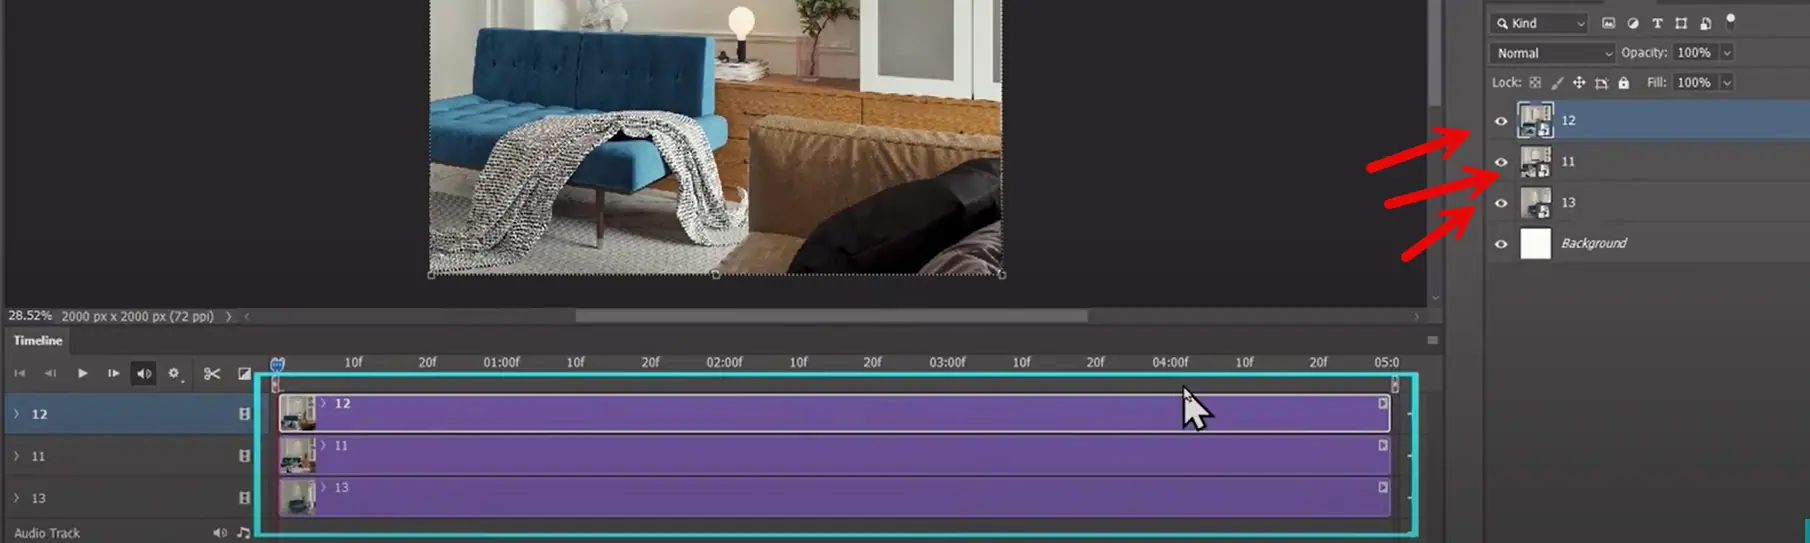
Scene Organization
Rename your imported images for better organization:
Scene 1
Scene 2
Scene 3
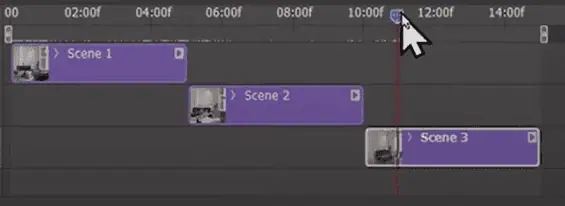
Use the timeline slider to control scene duration
Arrange scenes to prevent overlap.
4. Test visibility by moving the slider – you should see each scene clearly.
Let’s Go About Creating Dynamic Animations
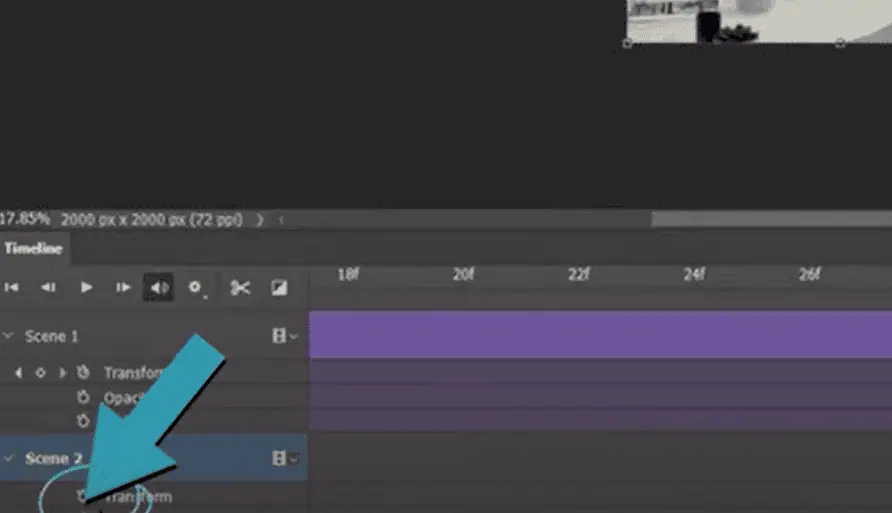
Scene 1: Zoom Out and Panning Effect
Access animation controls:
Click the drop-down arrow beside Scene 1
Click the stopwatch icon to toggle the animation
Add an animation keyframe for transform
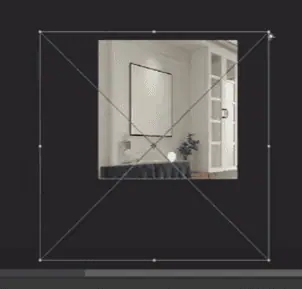
Create a starting position:
Press Ctrl + T to activate the Transform tool
Scale the image up for the zoom-out effect
Drag sideways for the panning effect
Click the checkmark above to confirm
Note: A small dot (keyframe) will appear below the scene marking the motion start
3. Set end position:
Move to the end of the clip
Activate transform again
Slide sideways until the frame is centered (for panning)
Reduce size slightly for zoom-out effect
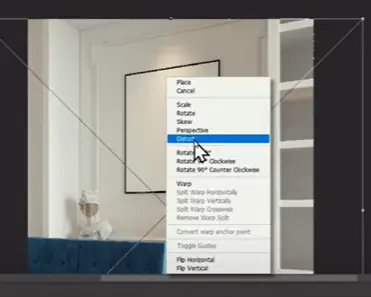
Adjust perspective:
Right-click and select “Distort”
Adjust the image as needed
Click “OK” to confirm
Preview the scene to verify smooth motion
Scene 2: Smooth Zoom In Effect
Initial setup:
Set the slider at the beginning of the scene
Toggle on the stopwatch to transform
Create morphing effect:
Scale the image slightly
Center it to create continuity from Scene 1
End position:
Scale the image up further
Ensure only the frame is visible
Preview to verify a smooth transition
Scene 3: Smooth Panning Effect
Starting position:
Scale up the image
Drag to one side
Ending position:
Drag to the opposite side
Ensure mockup visibility is sufficient
3. Adjust as needed for the desired animation
4. Preview for smooth transitions
Professional Transition Effects
Adding Fade Transitions
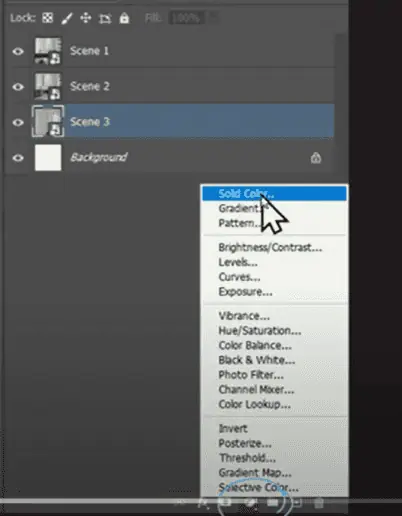
Create transition layer:
Add a solid color adjustment layer
Choose black color
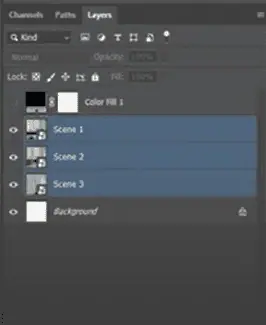
Layer organization:
Turn off color layer temporarily
Group all scenes into a folder named “Scenes”
Position transitions:
Place color adjustment layer between scenes
Reduce its length
Center between scenes
Animate opacity:
Toggle on the stopwatch for opacity
Set 100% opacity at center of the adjustment layer
Set 0% opacity at both ends
Repeat the process for all transitions between scenes
Converting Animation to Template
Creating Smart Objects for Design Placement
Understanding smart objects:
Required to make the video an actual template
Allows users to add their designs
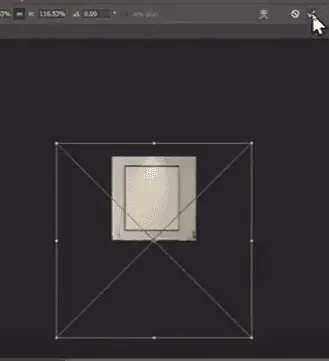
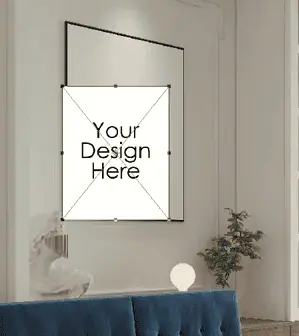
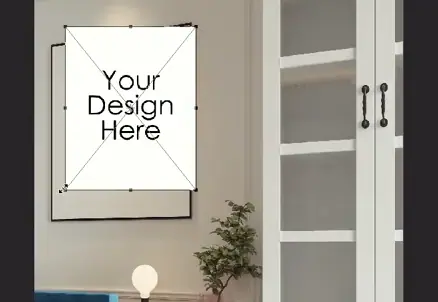
Placeholder implementation:
Download a pre-made placeholder (recommended method)
Ensures equal dimensions across all frames
Adding placeholders:
Import placeholder above the first scene
Increase size slightly
Position over mockup frame
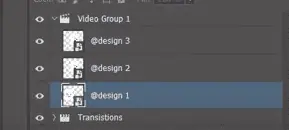
Repeat for all scenes:
Import three placeholders (one per scene)
Name them “Design 1,” “Design 2,” “Design 3”
Adjusting Placeholders
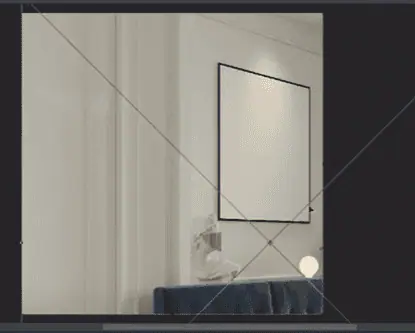
For Design 1:
Zoom in to see frame corners clearly
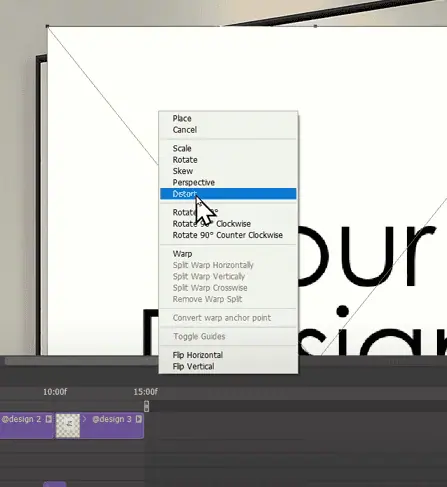
Activate transform
Right-click and select distort
Pin each corner of the placeholder to the wall frame
Adjust placeholder at animation end
Add keyframes as needed for smooth transitions
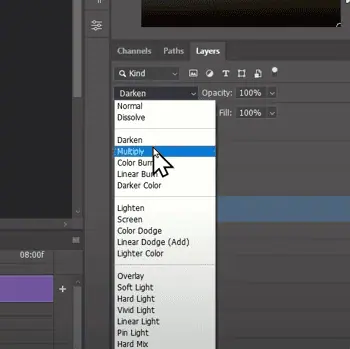
Set blend mode:
Change to multiply for natural blending with background
Repeat process:
Apply the same steps to the second and third scenes
Testing and Export Process
Adding Test Designs
Insert designs:
Double-click placeholder thumbnails
Insert test images
Save and close
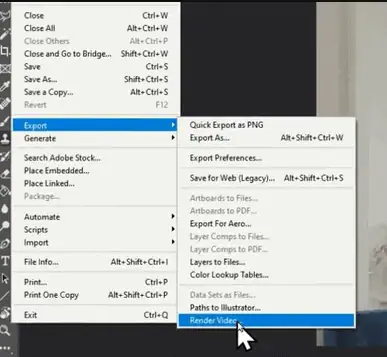
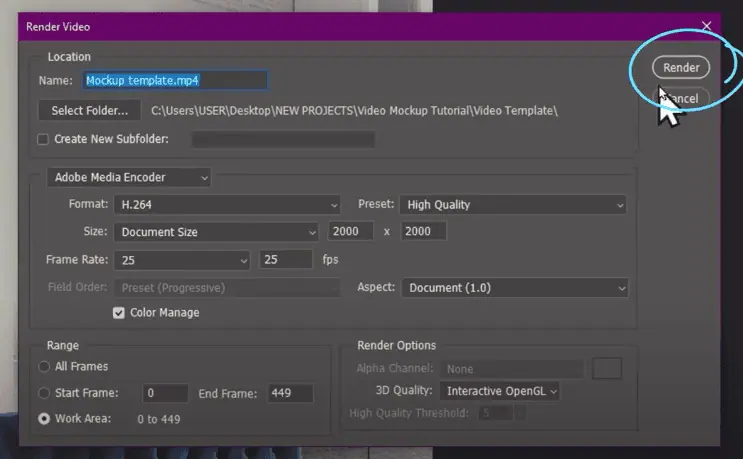
Export Settings
Navigate to File > Render Video
Configure settings:
Set framework to 25 or 27
Keep other settings at default
Click “Render”
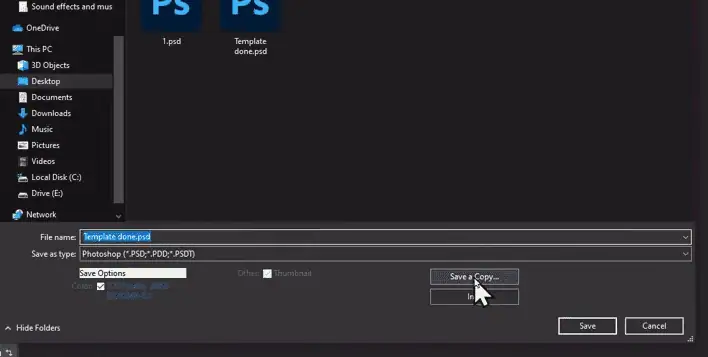
Preparing for Distribution
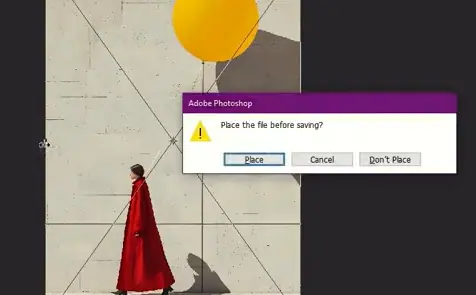
Remove test designs
Save as a Photoshop document
Ready for upload to:
Etsy
Creative Market
While I’m sharing the fundamentals here, creating truly professional video mockups requires mastering advanced techniques like multi-angle room creation and sophisticated keyframe animations.
[ I cover these in-depth in my complete Etsy mastery course, available at a special pre-launch price. ]
How Can You Create Polished Wall Art Video Mockup Templates on Canva?
Before You Begin, you’ll need two essential items to get started:
A Canva-free account
A quality mockup template.
For this tutorial, we’re using a Funky Frame template designed to create video mockups. The quality of your template will significantly impact your final result, so choosing a good template is crucial.
Detailed Step-by-Step Process
Part 1: Initial Setup
Begin by properly setting up your workspace in Canva:
Template Preparation:
After purchasing your template, download it to your computer
Open Canva and import your downloaded template
When your template opens, you’ll see multiple design options
Select the specific template design you want to work with
Remove any additional elements you won’t be using in your video mockup
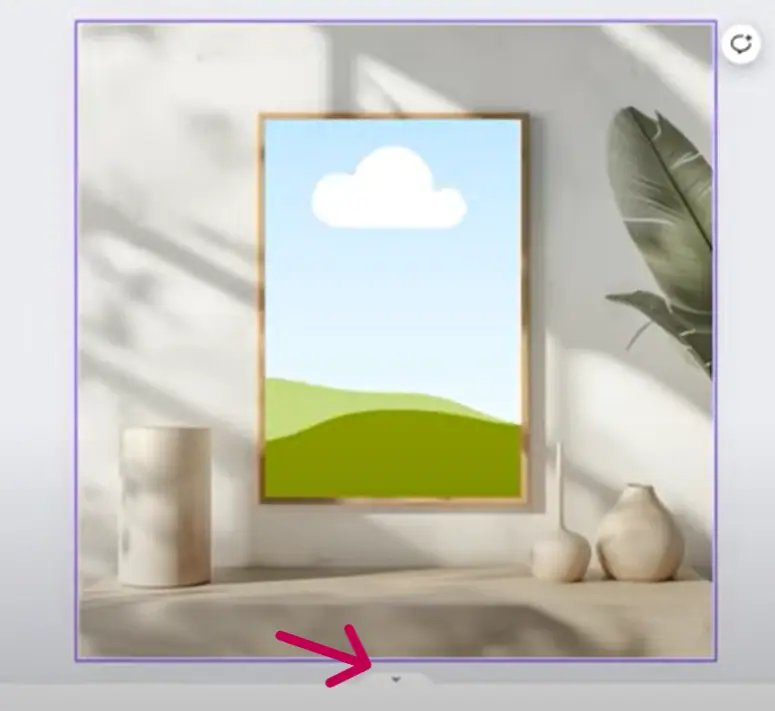
2. Converting to Video Format:
Look for a small arrow located at the bottom of your design
Click this arrow to reveal additional options
Find and click on “Duration” This crucial step transforms your static design into a slide that can be animated. Without this step, you won’t be able to create video effects.
Part 2: Template Customization
Now we’ll modify the template to match your specific needs:
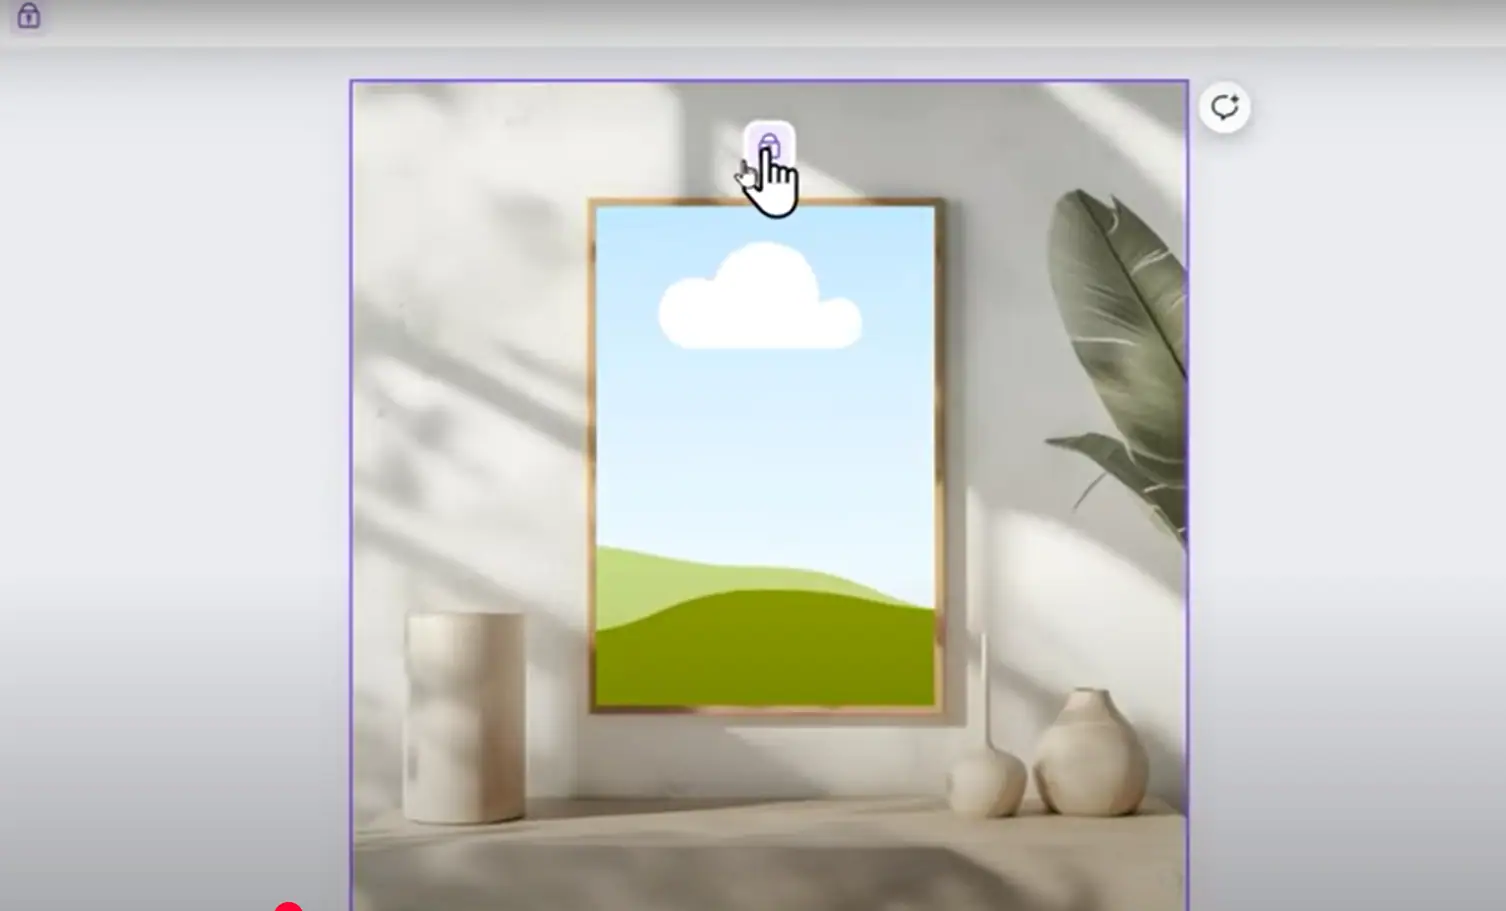
Unlocking Elements:
Locate any locked elements you need to modify
Click on the locked element to select it
Look for the lock icon that appears above the selected element
Click the lock icon to unlock the layer This unlocking process is essential as it gives you complete freedom to customize every aspect of the design.
2. Background Adjustment:
First, unlock both the shadows and the background elements
Scale up the background carefully
Your goal is to make the frame fit the screen as completely as possible
After scaling, ensure you return any displaced layers to their original positions This step creates a professional-looking base for your video mockup.
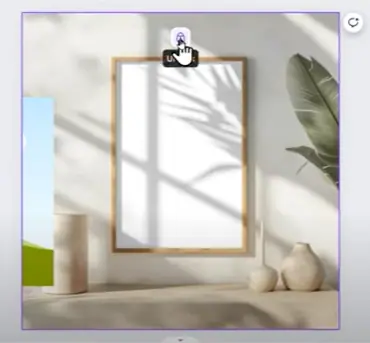
3. Adding Your Artwork:
Locate and delete the existing art placeholder in the template
Upload your wall art design to Canva
Drag your uploaded artwork directly into the frame
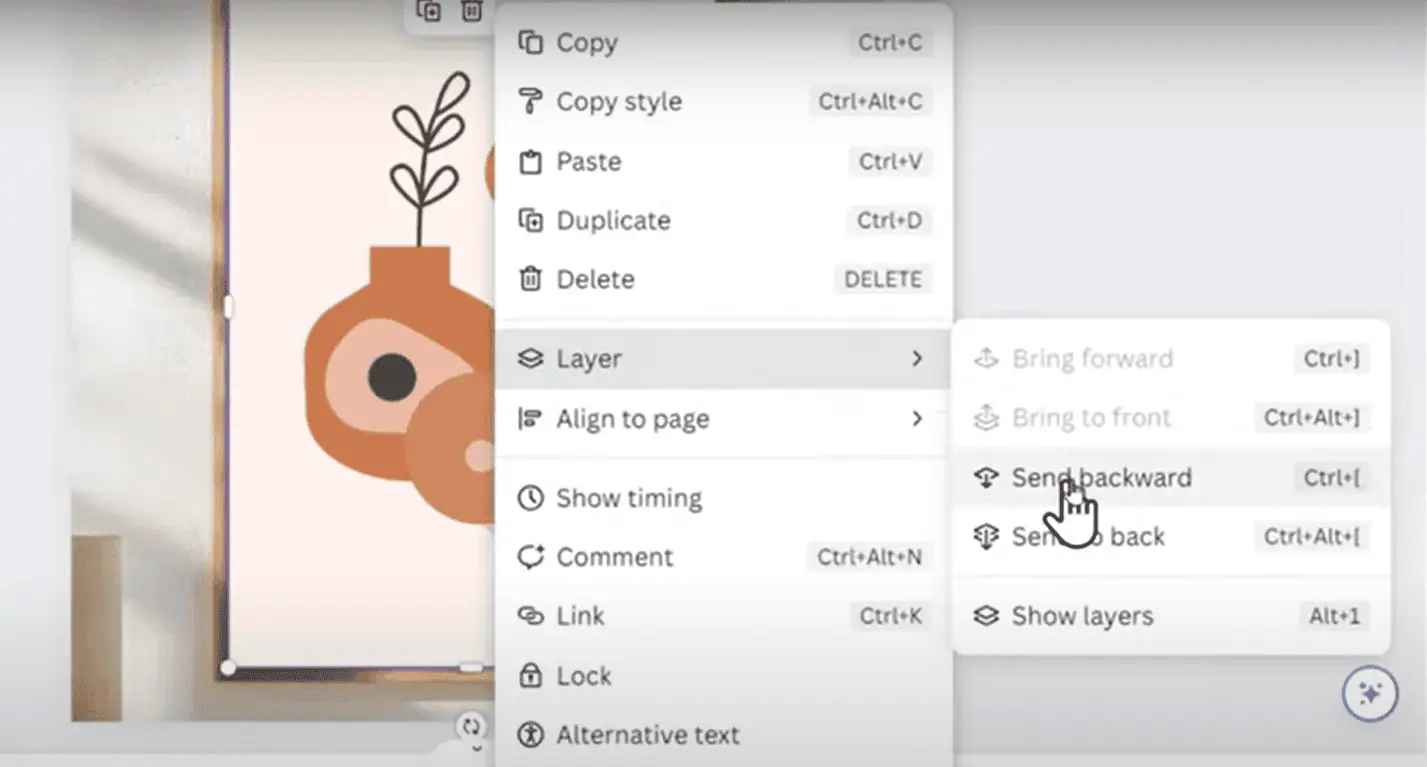
Right-click on your newly placed artwork
Select “Layer” from the menu that appears
Choose “Send Backwards” from the layer options This sequence ensures your artwork sits correctly within the mockup frame.
Part 3: Organization and Animation
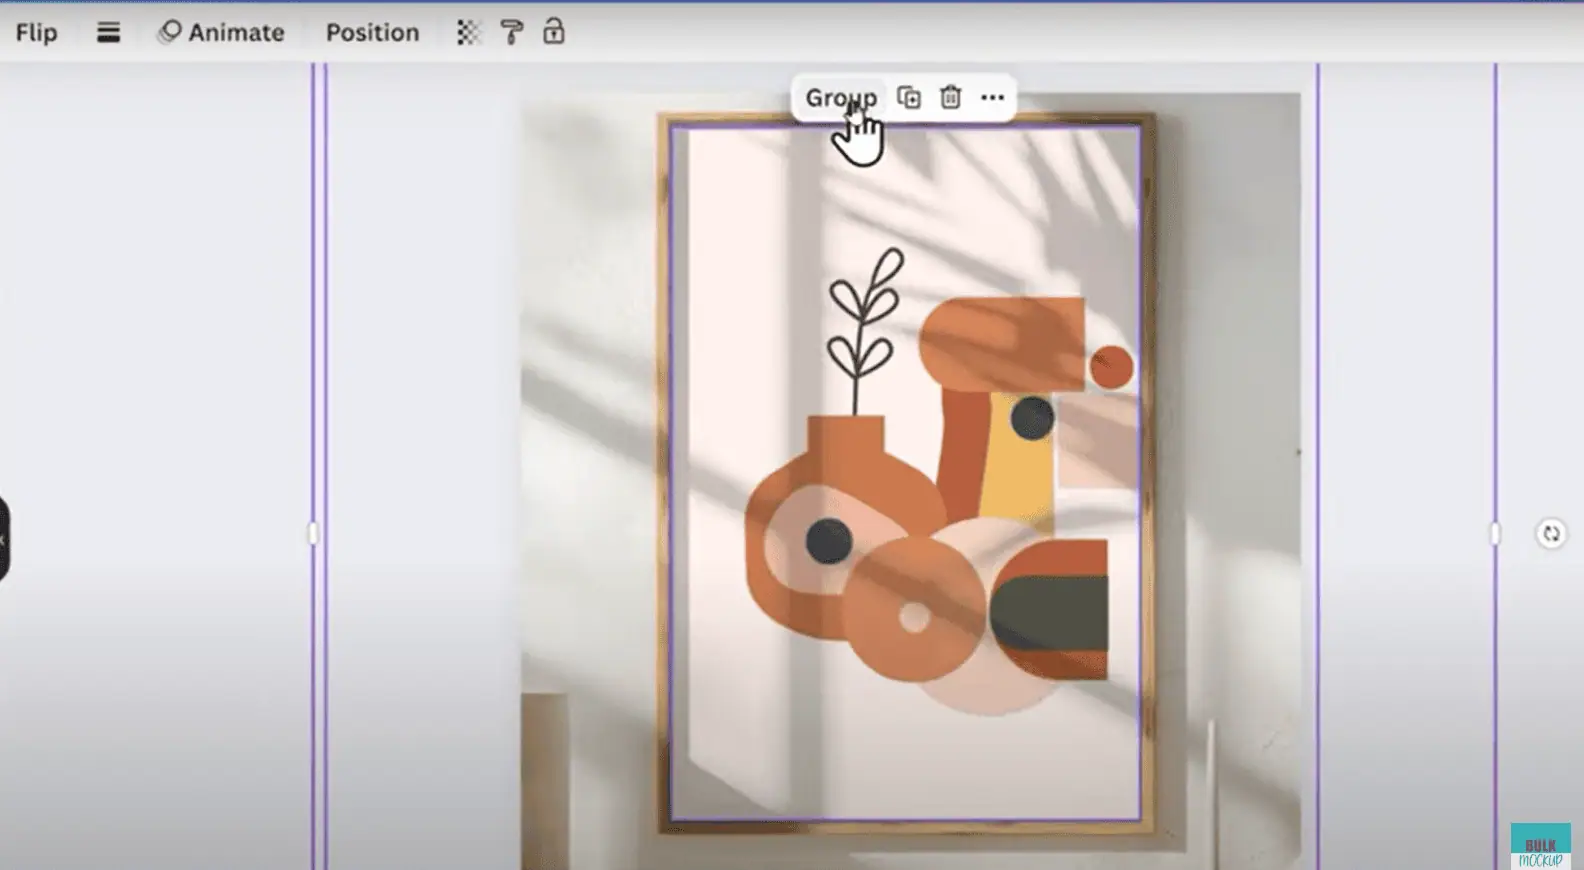
1. Grouping Your Elements:
Press Control + A (or Command + A on Mac) to select all layers
Look for the “Group” option in the top menu
Click “Group” to combine all elements. Grouping is crucial as it ensures all elements move together during animations.
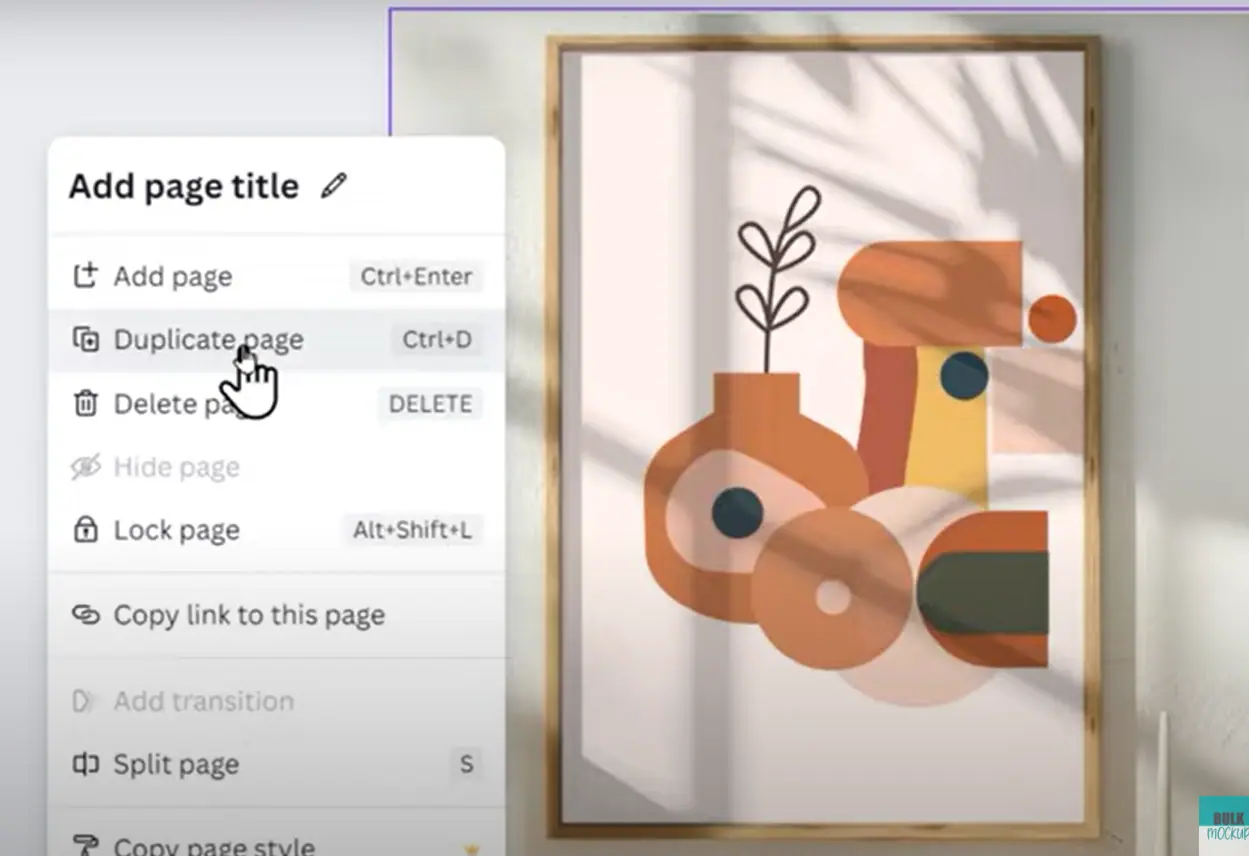
2. Creating the Animation Sequence:
Locate the three dots in the top right corner
Click these dots and select “Duplicate”
This creates an exact copy of your grouped elements
3. Adding Professional Transitions:
Move your cursor between the two clips
Wait for the transition icon to appear
Click on this icon when it shows up
Select “Dissolve” from the transition options
Set the transition duration to exactly 1 second This creates a smooth fade effect between your scenes.
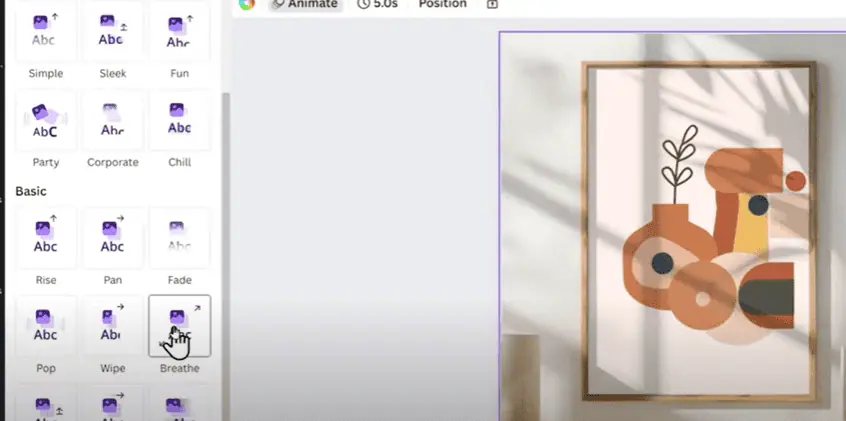
4. Adding Dynamic Movements: For Your First Slide:
Add an animation effect
Specifically, choose the “Breathe” animation
This creates a professional zoom-out transition
5. For Your Second Slide:
Add another animation
Select the “Tectonic” effect
This creates a smooth panning movement from left to right These animations bring your mockup to life without being overwhelming.
Part 4: Finalizing and Exporting
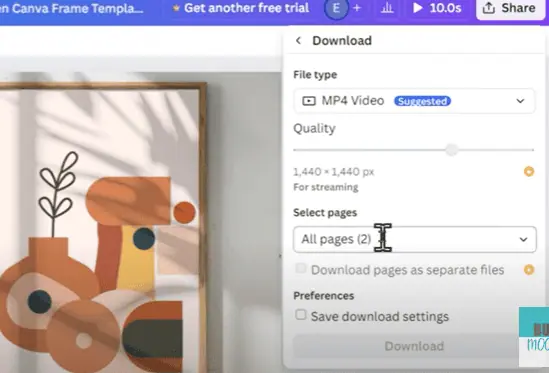
1. Exporting Your Video:
Click the “Share” button in Canva
Select the “Download” option
Choose MP4 as your format
Make sure “All Pages” is checked
Click the final “Download” button Your video mockup will now be saved as a professional-quality MP4 file.
Advanced Possibilities
While this guide covers creating individual video mockups, there’s potential for much more. In the next level of production, you can learn:
How to batch create hundreds of mockups efficiently
Techniques for automating the entire creation process
Methods for saving hours of production time
Ways to streamline your workflow while maintaining quality
For Best Results Always Remember These
Template Selection: Choose a template that matches your brand aesthetic while maintaining professional quality.
Animation Timing: The 1-second transition timing is crucial for smooth, professional-looking results.
Quality Check: Always preview your video several times before finalizing the export.
File Management: Keep your original template safe and create copies for each new design.
Grouping Elements: Double-check that all elements are properly grouped to prevent misaligned animations.
Common Troubleshooting
If your animations aren’t smooth:
Verify all elements are properly grouped
Check that transitions are set to exactly 1 second
Ensure your artwork is properly placed within the frame
Confirm all layers are in the correct order
Remember, while creating individual video mockups is valuable, the real potential lies in scaling up your production. The techniques learned here form the foundation for creating multiple mockups efficiently, which can significantly impact your wall art business’s presentation and success.
In Case You Need Help
So you think you are ready to tap into this explosive market opportunity? Don’t wait until video mockups become oversaturated. I’ve created a comprehensive course that takes you beyond the basics, teaching you professional techniques that will set your templates apart.
From mastering complex room angles to creating buttery-smooth animations that customers love, you’ll learn everything needed to build a successful video mockup business. Pre-order now and lock in the special launch pricing before it increases.
Vikash is the founder of Bulk Mockup, a specialized plugin that integrates with Photoshop to streamline mockup creation for print-on-demand sellers. Drawing from his experience running Putoos Graphics LLP, an image editing agency serving hundreds of e-commerce entrepreneurs, he recognized the time-consuming challenges of manual mockup production. Bulk Mockup was developed to automate this process, helping sellers save valuable time and resources while professionally presenting their products


![How to Create T Shirt Video Mockup Templates in Photoshop to Sell on Etsy? [NEW]](https://www.bulkmockup.com/wp-content/uploads/2025/02/Qikink-Mockup-Generator-768x402.webp)


