Learn how to effortlessly batch replace smart object layers in Photoshop using Bulk Mockup V3. Say goodbye to tedious manual work!
TL,DR :
Watch the video tutorial video to learn to batch replace smart object layer in Bulk
Replacing a Smart Object in one single design file is easy enough, and so is replacing them in maybe 5 designs.
But what happens when the number increases beyond that? What if you have to replace them in 10 files, or even 100? Is it still as easy to do?
That’s when batch replacing smart objects comes into play.
Doing them individually is no longer a viable option in most use cases and that’s why we go through this Batch replace the smart object process to save us from this tedious work.
Smart Object layers are special type of layers in photoshop that preserve layers source content with all its original characteristics. To understand it visually watch Module 6 of this free skillshare class.
Due to its special nature, smart object layers find many application and one of the go to tools for photoshop professionals and graphics designers.
Mockup Templates and Photoshop Templates are biggest application of Smart Object Layers
You can learn more about photoshop smart object layers.
Look at the mug template below, Smart object layer preserves curvature of the design.

If you were to place a new design on the mug and apply wrap to fit the curvature of the mug. High photoshop skills plus hours of manual work would be required.
However using the power of smart object, new design following the curvature can be added by just a click.


There are typically two approaches to replace the contents of Smart Objects in Photoshop.
The first method is more time-consuming, but it produces precise and accurate results. We do this by going into each Smart Object layer and opening the smart object canvas by double clicking on the smart object icon, thereafter manually inserting and resizing the desired design element. Once we save the smart object canvas psb document. The design element in the template is automatically updated.
The second method is faster, but it can potentially result in issues with the output files. We use this method by selecting the Smart Object layer, next right click and choosing the “Replace Contents” option, then selecting the design element we want to insert.
It’s up to you to decide which method is best for your specific needs and goals.
Bulk Mockup Photoshop Plugin is the easiest and quickest way to automatically replace smart object layers.
Watch the video below for a step by step guide.
Along with the features listed above. Bulk Mockup is capable of handling some advance smart object manipulation.
Photoshop Actions is a great way to automate repetitive task in photoshop. Similar to MS office macros in its working. You can record photoshop action showing it the way to do a particular process. There after you can play back the action to repeat the process for infinite times.
Unfortunately Photoshop Actions is futile and of no use, when you try to automate smart object layers replacement. Photoshop Action cannot record variable data and hence is useless.
Photoshop Droplet is similar to photoshop action in working. Only difference its execution.
Like photoshop actions, photoshop droplets too cannot be used to automate smart object replacement in photoshop.
Where Photoshop Action and Droplets fail. Photoshop Script can come to rescue. You can write a photoshop script to automate replacement of smart object layer. A photoshop script can be coded in javascript or apple script. Checkout photoshop scripting guide.
Unfortunately there is no way to batch replace smart object layer in photopea. You may want to use Bulk Mockup & Photoshop. If you are in a budget and do not want to invest in photoshop, you may also considering outsourcing mockup creation to bulk mockup team.
When you have to replace smart object in a large number of files, it can be difficult to keep track of the output images you want and ensure that they are properly saved and organised. This can add an additional layer of complexity to the process, and it’s important to have a plan in place to handle this issue.
As a company that has been in business for years, we’ve seen the evolution of designers and their needs.
Our user base works with hundreds or even thousands of Smart Objects on a daily basis, and we understand the challenges they face when it comes to managing and replacing them.
Bulk Mockup V3 is the only solution you’ll ever need for batch replacing smart objects because our Photoshop plugin is made by gathering feedback data from thousands of our customers and the issues they are facing.
Let’s solve your issues one by one.
You don’t have to select files one by one when using Bulk Mockup v3. You can just select the folders containing your PSD files with smart objects inside Bulk Mockup v3 and you’re done.
The next or rest of the process can continue from there.
You’ll never have to open and select smart objects one by one in Photoshop ever again.
Now comes the best part. The main task of replacing smart objects. For this, let’s get familiarized with Bulk Mockup v3 interface.
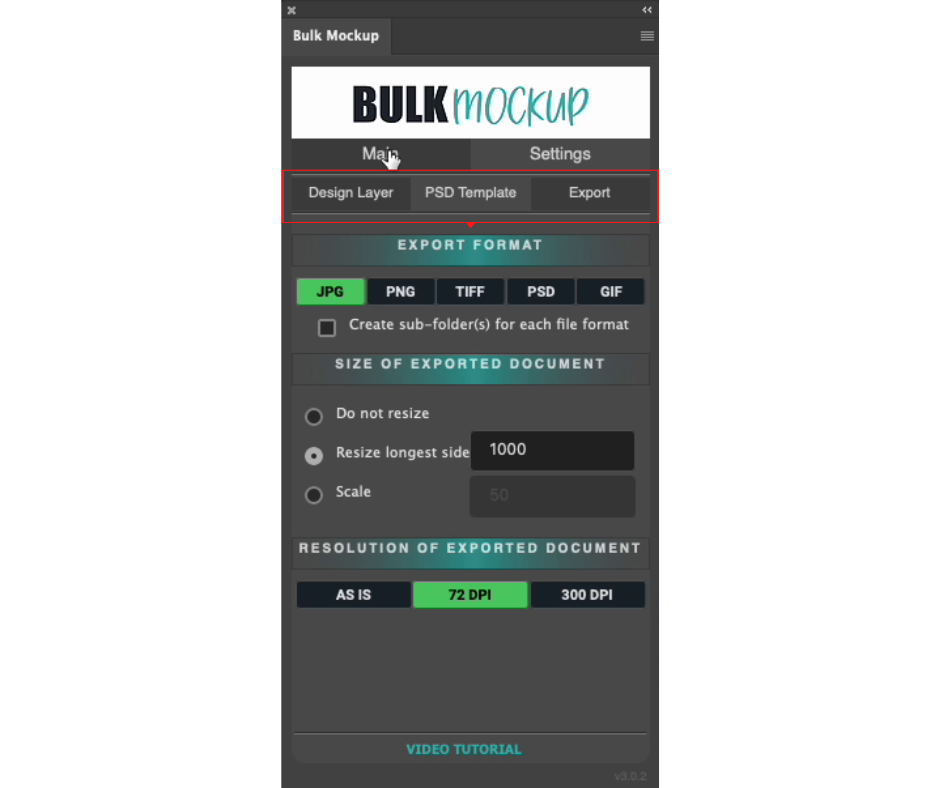
Here you can see, there are three options.
The options are self explanatory. Keep all your PSD files in one and all designs in one folder and select them with Bulk Mockup v3 option.
Then create an empty folder where you want all your finished designs exported.
We’ve gathered feedback from thousands of customers to create a comprehensive list of resizing options for bulk replacing smart objects in Photoshop.
Our options are clearly labeled and organised, and include a preview feature and the ability to customise size.
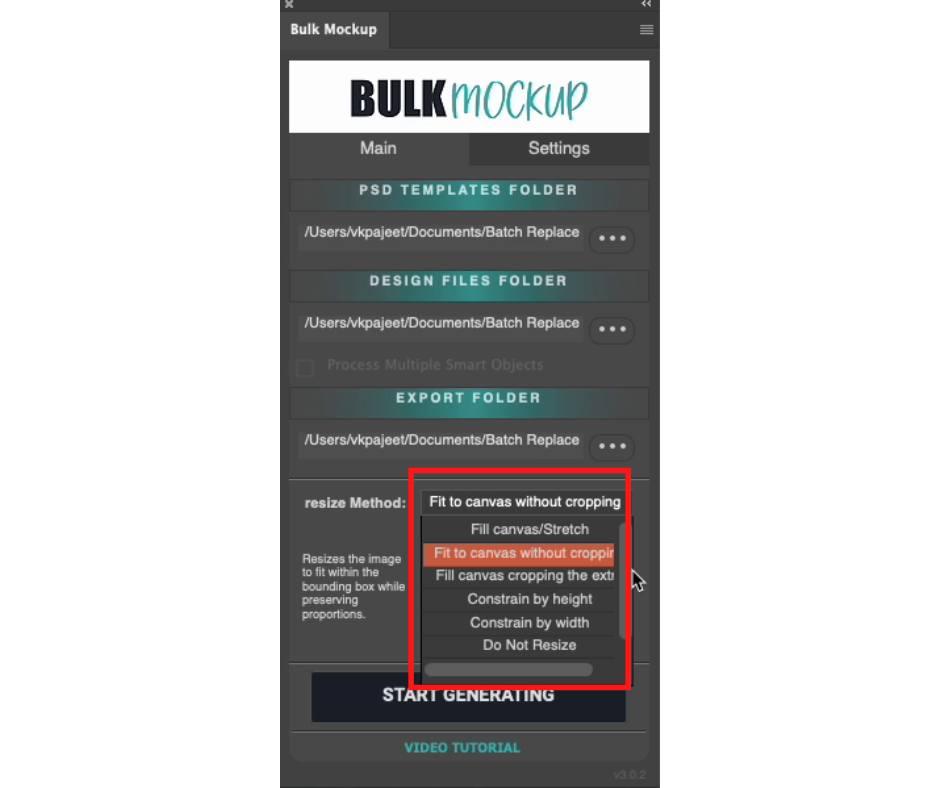
As you can see there are 7 options in total.
So as per your smart object layer content, you can choose whatever resize method you may find appropriate.
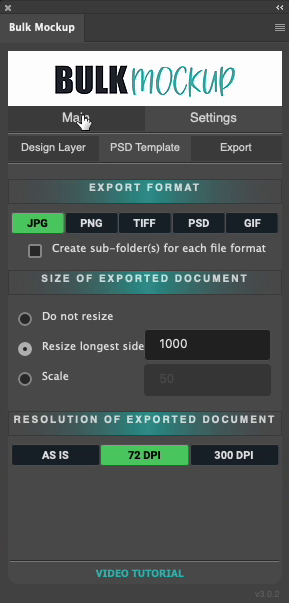
In the setting options, you can customise the output files even more.
There are five options available for this.
Here you choose either not to resize or set the limit to resizing the longest side or set the scale.
Here we have three options.
This is another critical issue designers face when working with a large number of files. In Bulk Mockup v3, we made it a breeze.
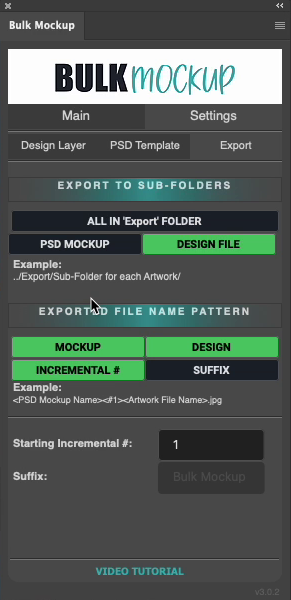
With Bulk Mockup v3 we didn’t just try to solve the issue, we packed it with options that are best practices for naming conventions and organising methods.
You have three options to work with.
You have four different options for naming patterns of the files. You can have the PSD file name, design name, increment by number and suffix.
You can choose all options or just the options you need.
The options work like this –
If you’ve gone through all the options above. Just go the main option and click “START GENERATING”
Now it doesn’t matter if you have ten files or a thousand, go sip a glass of wine or have some food like Bulk Mockups founder Vikash Kumar Prajapati just like the video below.
How to batch Replace Smart Objects in Photoshop | Smart Object MockupsAutomation
How to batch Replace Multiple Smart Objects Layers in Photoshop
In this YouTube video, he will take us through three different examples of how Bulk Mockup V3 for Photoshop can be used to batch replace smart objects, revealing all of the nooks and crannies of this powerful tool.
If you’re still confused, don’t hesitate to contact us through here.
Or if you’re completely new with Photoshop and need urgent help with your project, we have created a limited time service offering just for you. Don’t miss out on this limited time offer.
Question : Photoshop batch replace smart object?
Answer : Use Bulk Mockup photoshop plugin to batch replace smart object.
Question: How to replace smart object in photoshop?
Answer : There are two ways to replace smart object in photoshop.The first method is to go into each Smart Object layer and open the smart object canvas by double clicking on the smart object icon, thereafter manually inserting and resizing the desired design element. Once we save the smart object canvas psb document. The design element in the template is automatically updated.
The second method is faster. We use this method by selecting the Smart Object layer, next right click and choosing the “Replace Contents” option, then selecting the design element we want to insert.
Question : How to duplicate smart object photoshop?
Answer : To duplicate a smart object layer in photoshop select the smart object layer, press ‘ctrl + J‘ if you are on windows or ‘cmd + J’ if you are on mac. Other method is to drag the smart object layer to duplicate icon present at the bottom of the layers panel, just beside fx.
Question : Can you use a clone stamp on a smart object in photoshop?
Answer : No you cannot use clone stamp on a smart object layer. If you want to use, you can rasterise the layer and then use clone stamp.
Question: How to make an image not a smart object in photoshop?
Answer : Right click on the image layer and select ‘Rasterise Layer‘ to make image not a smart object.
Question: How to update a smart object in photoshop?
Answer :- There are two ways to update smart object in photoshop.The first method is to go into each Smart Object layer and open the smart object canvas by double clicking on the smart object icon, thereafter manually inserting and resizing the desired design element. Once we save the smart object canvas psb document. The design element in the template is automatically updated.
The second method is faster. We use this method by selecting the Smart Object layer, next right click and choosing the “Replace Contents” option, then selecting the design element we want to insert.
Question: Did you make adjustments to the code so it scales the smart object (like in height)?
Answer : Bulk Mockup does not require any adjustment to code. It has inbuilt feature that scales the smart object.
Question: Is there a way to automate the replacement of a Smart Image with a different graphic?
Answer : Yes there is, use Bulk Mockup Photoshop plugin to automate the replacement of smart image with different graphics. Step by step guide is available.

